When analyzing malware, it helps to have an isolated laboratory environment that you can infect with the malware sample to interact with it while learning about its capabilities. The lab typically involves several computer systems networked together. The computers can be physical boxes, but are often virtualized using tools such as VMware and VirtualBox for convenience and control purposes.
The Need for Isolating the Malware Analysis Laboratory
The analyst needs to put extra care to configure the lab in a way that minimizes the risk of the malicious program escaping onto the production network. For this reason, it’s not to connect the laboratory environment to the corporate networks. Extra care needs to be exercised when virtualizing the lab, not only because of the potential vulnerability that could allow an escape from the virtualized system, but also to account for possible configuration and user errors.
My earlier article described how to use VMware to build such as lab. There, I advised the use of the host-only networking option for interconnecting virtual systems using a simulated network without additional hardware. This setup works well; however, it has the weakness of allowing the physical host and virtualized systems to interact with each other through a virtual network adapter that VMware installs onto the physical host.
Defining a Dedicated Virtual Network
To exercise tighter control over the virtualized network of your lab when using VMware, consider creating a new virtual network for the virtualized systems, instead of using the default host-only network. If your physical host is running VMware Workstation on Windows, you can do this through the following steps:
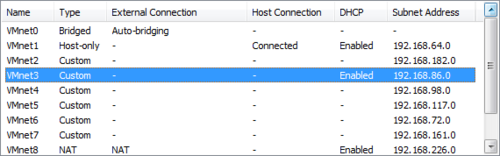
- Edit > Virtual Network Editor.
- Pick a network that’s not being used, such as VMnet3. VMnet0, VMnet3 and VMnet8 are used by VMware by default, so I suggest not modifying them.)
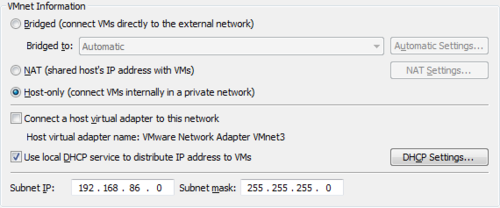
- Enable the “Use local DHCP service” if you’d like to use the DHCP service built into VMware. You’ll want to do this unless you have another DHCP service in the lab or plan to statically assign network configuration details to your virtualized systems.
- Enable “Host-only” if it’s not already selected.
- Disable “Connect a host virtual adapter to this network” if it’s not already deselected.
- Click OK
The settings should look something like this:
Other virtualization software, such as VirtualBox, offers similar capabilities, though the interface will look different.
Assigning the Dedicated Virtual Network
At this point the desired virtual network (VMnet3 in my example) should be ready for use. Now you need to configure your virtualized systems to use it. To do that, go to VM > Settings in each virtual machine, change the Network Adapter to use the Custom network connection and pick the desired network (i.e., VMnet3):
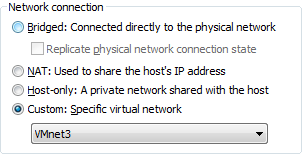
If your virtualized systems are configured to use DHCP, they should get the new network settings automatically after a reboot.
Hand-picked related posts:
- Using VMware for Malware Analysis
- 5 Steps to Building a Malware Analysis Toolkit Using Free Tools
- Using Free Windows XP Mode as a VMware Virtual Machine